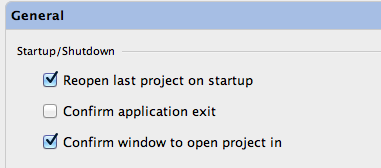
10 Jul 2012 When you (re)open a project in PHPStorm, it will ask you whether you want to open it in a new window or current. If you choose new window it will open another instance of PHPStorm and open there your project, if you choose otherwise it will replace the curent workspace with the new project. There is also a checkbox saying don't ask me again and then this will be the usual setting from now on. Now what if you did something and then you regret. It took me some time to find out how to change this. Here it is. It's quite simple actually and I would probably found it faster if I didn't google for it but just would use some common sense and find it myself (which I eventually had to reserve to since googling did not help)
It's basically Settings->General->Confirm window to open project in

08 Jul 2012 As it turns out, it is extremely easy to add gestures to your Windows Phone app. All you need to do is add a reference to the Silverlight Toolkit
xmlns:toolkit="clr-namespace:Microsoft.Phone.Controls;assembly=Microsoft.Phone.Controls.Toolkit"
Then add the following code to any UI element (button, textbox etc...) that you want the gesture to be applied to and implement the listeners in your .cs file
<toolkit:gestureservice.gesturelistener>
     <toolkit:GestureListener
         DoubleTap="GestureListenerDoubleTap"
         Hold="GestureListenerHold"/>
</toolkit:gestureservice.gesturelistener>
Last step is the implementation of the listeners:
private void GestureListenerDoubleTap(object sender, GestureEventArgs e)
{
    MessageBox.Show("Double tap gesture");
}
and
private void GestureListenerHold(object sender, GestureEventArgs e)
{
    MessageBox.Show("Hold gesture");
}
That's it. It is THAT simple
</center>
08 Jul 2012 That's how to determine theme accent color on Windows Phone 7
// Determine the accent color.
Color currentAccentColorHex =
    (Color)Application.Current.Resources["PhoneAccentColor"];

switch (currentAccentColorHex.ToString())
{
    case "#FF1BA1E2": currentAccentColor = "blue"; break;

    case "#FFA05000": currentAccentColor = "brown"; break;

    case "#FF339933": currentAccentColor = "green"; break;

    case "#FFE671B8": currentAccentColor = "pink"; break;

    case "#FFA200FF": currentAccentColor = "purple"; break;

    case "#FFE51400": currentAccentColor = "red"; break;

    case "#FF00ABA9": currentAccentColor = "teal (viridian)"; break;

    // Lime changed to #FFA2C139 in Windows Phone OS 7.1.
    case "#FF8CBF26":
    case "#FFA2C139": currentAccentColor = "lime"; break;

    // Magenta changed to # FFD80073 in Windows Phone OS 7.1.
    case "#FFFF0097":
    case "#FFD80073": currentAccentColor = "magenta"; break;

    // #FFF9609 (previously orange) is named mango in Windows Phone OS 7.1.
    case "#FFF09609": currentAccentColor = "mango (orange)"; break;

    // Mobile operator or hardware manufacturer color
    default: currentAccentColor = "custom eleventh color"; break;
}
30 Jun 2012 An interesting podcast from the CEO of Joyent who is the largest user of Node and the current employer of the creator of Node.
The discussion revolved around what Node is good for and what it was not designed to do and why people who say that Node doesn't work for them are just not using it right. The rule of thumb - use the right tool for the job still remains right in software industry and will probably do so for a foreseeable future.
29 Jun 2012 Ever wondered how you can type on your Wp7 simulator using your keyboard?
Here's a list of useful keyboard shortcuts for the WP7 emulator which includes the answer to the above question.
| Key | Description |
| F1 | Use F1 key on the keyboard instead of back button on the phone |
| F2 | Use the key F2 on the keyboard for the Windows key in the Windows Phone 7 |
| Pageup | Enables the keyboard in the emulator when the focus is on the textbox |
| PageDown | Disables the keyboard in the emulator |
| F3 | To open the Bing Search |
| F7 | To Activate the Physical Camera |
| F9 | Increase the Volume |
| F10 | Decrease the volume |
22 Jun 2012 "To be a good programmer, you have to be a good tester"
that's the hidden (or not so much) assumption what lies in the TDD (or Test Driven Development) methodology
04 May 2012 Google was and is pushing for better web both on desktop and now on mobile too.
Here's a nice website that will help your company to transfer to mobile space: http://www.howtogomo.com/
They even have a gomometer which will analyze your site and give an advice on how to improve it so it is more "mobile friendly"
05 Apr 2012 To import an SVN repository into git, you can use the git svn command.
If you want to just import your SVN repository into Git as is, you can run the following sequence of commands:
$ git svn clone SVN_REPO_URL LOCAL_DIR
$ cd LOCAL_DIR
$ git remote add origin git@example.com:USER_NAME/REPO_NAME.git
$ git push origin master
If you repository is setup in a standard way and you want the git svn command to be smart about it, you should add the -s flag to the first command:
$ git svn clone -s SVN_REPO_URL LOCAL_DIR
$ cd LOCAL_DIR
$ git remote add origin git@example.com:USER_NAME/REPO_NAME.git
$ git push origin master
Which basically says to git svn that your repository is in a standard layout.


